FAQs
-
Find Your Rough Opening, Frame/Slab Size, and Jamb Depth

Measure twice, even three times
1. If you are looking to find the rough opening see steps 2 & 3. If you have an existing frame/slab see steps 4 & 5. If you're looking to find the jamb depth see step 6.
2. First, grab your tape measure. For the rough opening start by measuring the daylight opening width from the inside face of the stud wall or masonry opening to the other side. It is best to measure points in the opening near the top, middle, and bottom recording the smallest number of the three to account for anything out of square in the opening.
3. Next, to get the rough opening height use the same idea and measure the inside face of the stud wall or masonry opening from the top to the bottom of the sub-floor or concrete. Again, record the smallest measurement. Record the width from the previous step and the height from this step and you now have the rough opening size. (width x height)
4. For an opening with an existing door unit, first remove any interior casing or trim from the top and sides to expose the door frame from the wall. From the inside of the home looking outward measure the outermost edge of the frame from one side to the outermost edge of the frame on the other side and record the width of the frame. To measure the slab - hook your tape measure to the edge of one side and measure across the face of the door to the other edge of the other side and record your width. To get the thickness measure the front edge on a side to the back edge on the same side and record the thickness.
5. Next, to get the frame height measure from the top outermost edge of the frame to the bottom edge of the sill for an exterior door. Most interior door units are sill-less in which case measure from the top outermost edge of the frame to the floor. Record the width from the previous step and the height from this step and you now have the frame size. To get the slab height - hook your tape measure to the top edge and measure down the face of the door to the bottom edge. Record the slab width from the previous step and the slab height from this step and you now have the slab size. (width x height) Note: When ordering a door unit from millworkforless.com we still need a rough opening to ensure that when we build the door unit using our standard specs it will have the best tolerances in the rough opening.
6. To determine the jamb depth that your frame should be measure the thickness of the wall construction which most often times will encompasses several things (drywall, stud wall, block, brick, stucco, stone...). The frame depth can be less than the overall wall construction or more depending on the look that you desire. Be sure to determine if you would like the frame to be flush with the thickness of the wall or offsetting when ordering your door unit.
Tips:
For a home framed with 2x4s the standard jamb depth is 4-9/16". For a home framed with 2x6s the standard jamb depth is 6-9/16".
For a radius top door unit let us know the radius of the header if possible. If not, record the peak height, two leg heights, and width of the rough opening so we can determine a correct radius to fit the opening.
-
Setback for bore option:
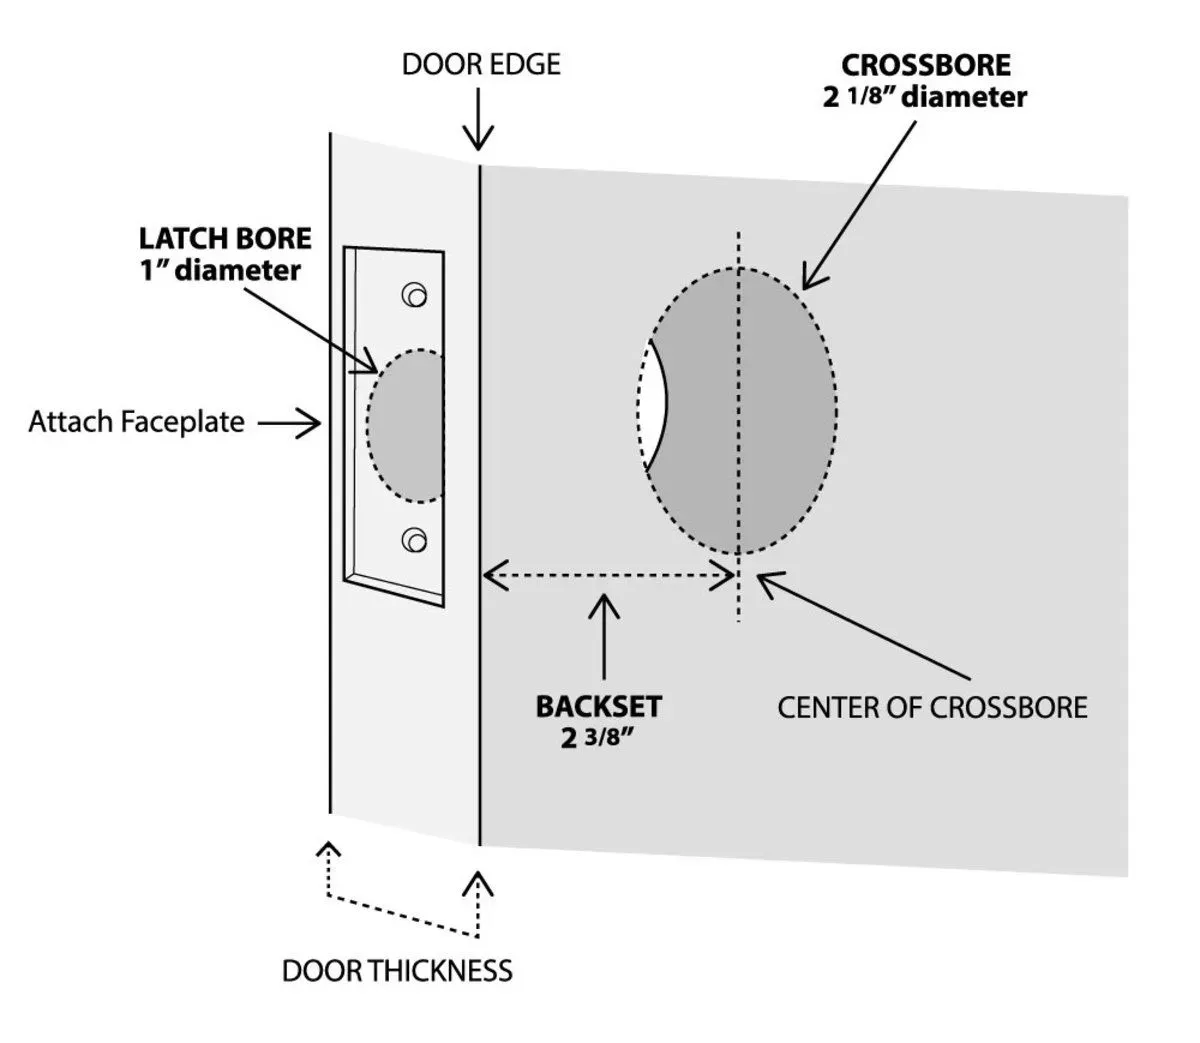
Our lockset bore backset is 2-3/8”.
-
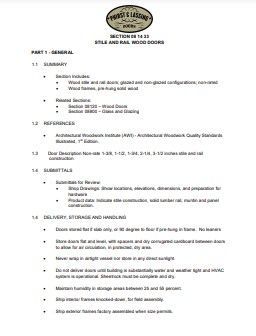
Submittal Specifications
 Download
SECTION 08 14 33
STILE AND RAIL WOOD DOORS
• Section Includes:
• Wood stile and rail doors; glazed and non-glazed configurations; non-rated
• Wood frames, pre-hung solid wood
• Related Sections:
• Section 08120 – Wood Doors
• Section 08800 – Glass and Glazing
-
Keeping up appearances: How to inspect and maintain a wood door

At least every 6 months you should take the time to inspect your doors and windows from the outside of your home. We consider washing and waxing our car a standard part of automobile ownership. But nothing receives more abuse than your doors and windows. After all, many people trade their automobile every 18 to 36 months, but they may plan on living in their home for 15 to 20 years. Why would you assume the exterior of your home requires no attention?
Cleaning your windows and doors exterior is every bit as easy as washing your car, assuming you do not always just take your car through a car wash (if you need tips on washing your car, we can give you those as well.) Just like a car, get a bucket and clean water. Using an automobile or car wash detergent, follow the directions as though you are washing a big car. A truck brush is handy because it has a telescoping handle and soft synthetic bristles. Washing your window or door one by one, just as a car, hose the window or door down with a garden hose. Do not use a pressure washer as this can damage finishes and other parts of your home. Do not worry if a bit of water leaks in your window or door. Why, because this is as good test to find out if you have a cavity in your window or door. Anywhere water is leaking, more air is leaking and, you can address those leaks to better prepare your home for harsh weather.
After fully rinsing your door or window, give it a good cleaning with a sponge or truck brush and immediately rinse the soap away. ***This is the important part of examining the finish of your wood door. When rinsing the door, the water should bead and run quickly down the door, leaving a dry finish above the water beads. If the water drags down the door and just hangs onto the wood, your finish has ultra violet damage and needs a new top coat. If you see blackened areas in the wood, typically at the bottom of the door, you have likely let your finish go too long. Regardless, if your finish shows wear, follow our simple steps for lightly sanding and applying a new top coat to your door using Sikkens Cetol door and window. Hopefully this is the product your door had on it from the outset of its life. The tips above apply to a painted door as well.
Drying your windows and doors will minimize spotting. You can use a soft dry terry cloth bath towel our favorite method is to get out your leaf blower and blow dry each door and window after you wash the opening. Blow drying forces water, gook and hiding bugs out of the crevices and , this procedure assists you in looking for areas of disrepair that might require maintenance.
If you have aluminum clad exterior windows like most upper end homes do today, you can also treat those windows as you would your car when it gets a dull finish. Use a high quality polish which will bring your aluminum back to life (if you have Andersen or other vinyl windows, oh well.) Never use a rubbing compound or abrasive car wax because these compounds will remove finish from your aluminum cladding advancing the aging of your finish instead of helping the finish.
Do not be afraid to clean your home’s exterior, do not be afraid of getting a little water in your home when washing, after all , you want to know where your home’s weaknesses are so that you can repair them. Too many people today go to sell their home, and through the findings of a buyer’s home inspector, discover they have many issues to repair which can not only be costly, but can possibly deter a prospective home buyer. Be a good detective! Know your home’s weaknesses and correct them.
A clean home is a happy home!
-
How should I care for my hardwood door?
 Finishing Kits
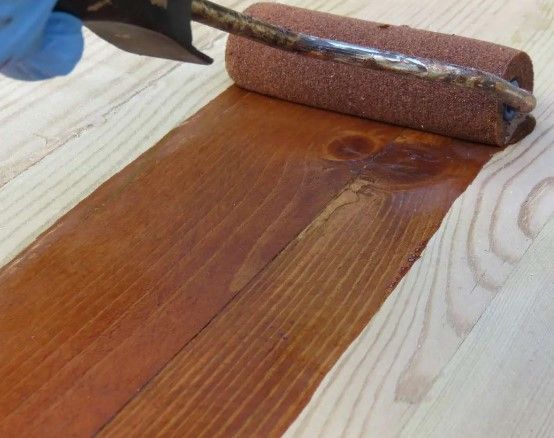
Wood door maintenance really depends on direct sun/water exposure. The frequency of door maintenance varies with individual applications. A door without an over hang or porch is going to weather quicker than a covered door. The bottom line is every few months, look for dulling in your finish which is usually the result of sun burning your door. The sun’s ultra violet rays are bad things, but no worse on doors than anything else. We recommend that your door be wiped down or rinsed off. When pollutants accumulate on the finish, they are often very acidic and will really wear down a finish. You should always check for cracks in the caulk around your door unit, but this is no different for a wood or metal door. As a rule of thumb, every 12 to 18 months the exterior of a door should receive a light sanding with fine sand paper, about 220 grit. After this, one should take a clean cloth, apply a little paint thinner to it and thoroughly wipe the door off. After the door dries for a few minutes, apply a single top coat of polyurethane. When applying polyurethane, brush it on. Please do not short cut and try the aerosol cans. It is important to get a complete coating on the door and do not be afraid to let the polyurethane drip into crevices and cracks to keep the door sealed for best protection against water damage. Voila, the door is good for another 12 to 18 months. It really is that simple. Finishing kits are available for purchase on this website.
Always remember, wood came from a living breathing tree and it is more sensitive to the elements than metal, but it is far more beautiful. It will change and grow in character over its life. With just modest attention and care, a wood door can last for many, many years.
-
Stainless Steel Handle Pulls and Hardware Maintenance

Stainless Steel is rust-resistant due to the alloy components of chrome and nickel. Regular care and maintenance, however, are still required to ensure the longevity and appearance of this material. Since the base material is a form of steel, surface staining can occur in aggressive environments and/or when contact with other metals or materials. Wash surfaces seasonally with warm, clean water and a mild detergent followed by a thorough rinse with clean water especially when surface deposits are visible. If any surface staining does occur, use only a stainless steel cleaner to remove the staining per the manufacturer's instructions. DO NOT use household cleaners, abrasive cleansers, or steel wool at any time to clean the surface.
For added corrosion protection in highly aggressive environments, clean hardware surfaces as noted above and carefully apply Boeshield T-9 as needed. DO NOT allow Boeshield T-9 to contact wood surfaces or other surfaces that tend to absorb oils as staining may occur. Wipe any excess.
-
Glass: When is "defect" not a defect?
 Learn more...
Quick Answer:
Move away from the glass.
Stand back 10 feet.
Face the glass straight-on at 90 degrees.
View in daylight but not direct sunlight.
Inspect the central 80% portion of the glass.
Under these conditions, if you can’t see it from 10 feet – it isn’t a defect.
That’s the short version.
-
Why Wood?

Finely crafted wood doors are a source of individual expression and beauty in domestic and commercial architecture. Wood has the ability to adapt to many designs, allowing for thousands of creative possibilities. Wood sets the standard for all other door types to achieve. But no other material delivers the architectural detail, precise shadow lines and mesmerizing grain patterns of wood.
The inherent warmth of wood doors is due to millions of naturally occurring, tiny honeycomb cells between the fibers, which provide a relatively high percentage of air volume, an excellent insulator. According to WDMA sources, wood's insulating properties are 600 times more effective than those of steel. And because wood doesn't conduct hot or cold like most man-made materials, the possibility of "thermal bowing" is diminished. Thermal bowing is caused by extreme temperatures, when one surface of the door is very cold at the same time the other side is very warm. When the cold side of the door contracts and the warm side expands, the uneven pressure that results may cause the structure to bow. Wood is much less susceptible to this problem.
-
Color Matching:
We Turn To Sherwin Williams For Fast, Reliable, Color Matches
We ship our doors all over the United States and parts of Canada. We like to cater to our clients in every way possible. One of those ways in particular is matching finish colors of existing millwork.
We have been using Sikkens ProLuxe finish for our exterior doors for the past two years. It is a tough and durable finish to say the least. Great for standing up against harsh weather elements. If a client decides they would like a color that is not in our wheel house we will turn to Sherwin Williams.
Clients simply mail us a color sample then we have SW match it using a piece of our wood. By using a Sikkens clear coat over the stain match we arrive at a finished product that looks great for years to come.
-
Door protection during remodeling and construction:

Doors installed during a home remodel or construction should be protected from construction traffic. However, never seal door behind an air tight vapor barrier as severe damage can occur to your door from excessive heat build up from the solar heat gain of sun exposure. No warranty applies to doors experiencing such conditions. The same applies to the installation of air tight storm doors over a wood door, steel door or fiberglass door.
-
Handling, Installing and Finishing

Entrance doors shall always be stored on edge, supported vertically (not leaning). Interior doors must be stored flat, in a clean, dry environment.
Doors shall not be exposed to excessive heat, dryness, humidity, or direct sunlight prior to finishing.
Handle door with clean gloves and do not drag doors across each other or other surfaces.
Deliver doors to the jobsite after plaster is dry. If doors are stored on the jobsite for more than one week, all edges must be sealed.
All hardware locations, preparations, and methods of installation must be appropriate for the specific door.
All doors 7' and under must have 3 hinges. Doors over 7' must have 4 hinges.
Prior to finishing, remove all handling marks with 150 grit or finer sandpaper and remove all sanding dust.
Apply sealer, primer, or first coat of required finish immediately after fitting, cutting for hardware, weatherstripping, etc. and before the installation of hardware or hanging the door.
All exposed surfaces of the door must be sealed, including the top, bottom, side edges, and the hardware cutouts.
Use only oil-based stains, sealers, or primers on the door. If water-based paint is to be used, it must be applied over an oil-based primer. (Note of Caution: An interior grade lacquer is NOT a satisfactory product for exterior use.)
All exterior surfaces, including the top, bottom, and sides of the door must be finish coated with a good quality exterior grade paint or varnish. At least three (3) coats of exterior grade varnish with a UV Inhibitor must be applied.
In order not to induce warpage or excessive deterioration of your door, avoid using dark stains or paints on the door surfaces exposed to direct sunlight.
Most finishes on exterior doors deteriorate relatively quickly. To insure exterior doors receive the protection required, inspect the condition of exterior finish at least once a year and refinish as often as needed to maintain the protective stability of the finish.
Wood is easily planed at the home site to fit odd-sized openings. Imperfections in framing and jamb systems are not the roadblocks that they might be for non-wood, less-adaptable door materials. In addition, shavings from planing a wood door are much less irritating than fibers and other debris from man-made materials. Wood doors, when prepared properly at the home site, take stain evenly and beautifully. In this way, wood is more forgiving than non-wood surfaces.
“Do not use wood conditioners prior to staining mahogany, oak, cherry. Conditioner is good on woods with wild grain variations and most softwood products. On hardwoods, it most often seals the wood and prevents your stain from doing its job and penetrating the wood grain. Your finishes will tend to be light and off color.”
Like anything worthwhile, wood doors require care. We recommend you install wood entrance doors under an overhang that blocks the sun. When finishing the door, all six sides, (four edges and two faces), must be properly sealed, per manufacturers instructions. Avoid applying dark-colored paint, as it is more prone to noticeable fading in the sun. Inspect your wood door every one to two years.
-
Fire-rated door option:
 Inquire...
We can do most any door style for you in a 20 minute fire rated door (required nationally between your home and your attached garage). Up charge will apply.
-
Do you have any impact rated door systems that would meet Florida building code?
 DP-50 Structural Test
Yes, we can do DP-50 rated structural. We do not often do impact glass, but have doors for coastal applications.
*All doors shipping to Florida areas requiring DP rating will have $475 added to the price because they require special frames, sills & hardware to pass code.
-
Management of timber concessions:

The mills used for the production of Phirst and Lassing doors only utilize timber from government controlled forests. There is strict control over the harvesting and replanting of timber used in every Phirst and Lassing door. We can supply, upon request, government letters of certification to confirm that programs are in effect to protect the forest.